December 22nd, 2016
How To Kickstart Your Launch Planning Process + 53 Tasks You Can Start Today
 Welcome to the final part of this month’s series on producing a successful launch.
This week – we’re moving on from talking about systems & tools to diving deep into the planning process that will keep you focused & effective as you head toward that next launch.
I keep hearing the same things…
There’s so much on my launch to do list.
How will I actually get it all done? And what’s your launch planning process, Anne?
If you’re working on your first or next product launch, you know that the launch to do list seems to grow exponentially…and almost daily.
It’s hard when it’s your own growing list, but it’s even tougher when it’s a client’s list…
Now I talk about planning and scheduling A LOT, but I know that sometimes we all need to hear things repeated to us and in different ways.
So, today I’m sharing a new jumping off point with you to get you started “handling” all the potentially overwhelming pieces of a launch.
Depending on who I’m working with or what I’m launching, this particular process might change slightly. I am not a rigid, plan it and do it type person. That said, there are some rules I do live by.
Before you dive into this week’s episode, if you are new to launching, are just starting your business, you may want to check this post out where I compiled my top launch planning posts.
Launch Planning Rules I Live By
So, here are the 2-rules I use when I’m mapping out a project, trying to stay on track, and finally delivering a launch for myself or with a client. (Sometimes I need to remind myself of these two rules…)
Step one: Make the master list 6-9 (or more) weeks in advance
My absolute very first step is to write out all the things you might have to do, that you know you HAVE to do, AND you do it well in advance of your launch, you will avoid adding new things to the list daily.
You might be thinking it’s impossible to know everything about your launch that far in advance and sometimes, yes, you’re right. But as you get more experienced with your own launch process, you’ll get better.
Trust me though – starting early is the only way to go. Depending on the size of the project, you might even start earlier than 6-9 weeks!
Step Two: Set A List “Lock-Date”
When you’re working on a film production or tv show, there’s always a picture lock date. At that point, no new shots can be added, no new material can be created unless something is broken. Same thing in the game industry. At some point, changes cannot be made without a very good case.
Your Launch-Lock-Date means you shouldn’t be adding to the list…you should be editing and removing things from the list.
*If you work with clients – setting a lock-date is critical to what you’ll come to call feature creep. Those amazing ideas that keep getting added to the launch — set the boundaries early because you’ll be the one to suffer!
The Only [Swipe This] List You’ll See From Me…And You Need To Complete It
Well, I’ve created a very basic, in no particular order at all…I started this list of random tasks for you!
I sat down and just spewed out the most out of order list I could. Some of the items are small, some take more time.
All of them can be started and finished way before your launch.
First here’s an example list – depending on what you’re launching, you might make a similar list like this one…and I bet you can check off a few today (maybe even make some of these your TOP 3 for the day).
- Choose an email marketing provider
- Set up a simple optin list > and get it on your site
- Set up a customer list > even if no one’s added to it yet
- Write a blog post about your product
- Schedule a webinar or free call
- Ask a question in a Facebook group
- Answer a question in a Facebook group
- Write a blog post about that question/answer
- Pick 10-20 20 minute time slots on your schedule
- Offer time slots to people on your list
- Offer time slots to people following you on social media
- Create a graphic for your product or service
- Write the description of your product or service & who it’s for
- Mastermind with at least one person about your product/service
- Send out a survey
- Outline a blog series featuring people you’ve worked with
- Create an email series to send to new subscribers
- Schedule 2 podcast interviews for next month
- Pitch 2 guest posts to a bigger blog (bigger than you at least)
- Engage in your favorite Facebook group (believe it)
- Find a new Facebook group where you think your ideal customers might be
- Create super duper blog post – think of it as a kick off or call to action for your launch
- Set up your FB pixel in FB and then install on your site
- Track traffic to your site by looking at Google Analytics
- Track traffic to specific blog posts
- Create lookalike audience in FB Ads manager
- Decide where you’ll manage all your tasks – digital or analog
- Choose a task management tool and stick to it
- Choose membership site plugin/software if you need one!
- Install woocommerce or another shopping cart if you need it
- Buy domain for your product name if possible
- Set up wordpress on website
- Build the bones for product site (if it’s a digital product)
- Choose a payment processor – Paypal? Merchant account? Stripe? Gumroad?
- Make sure your email marketing provider – connects with your payment process
- Set up a test sales page with buttons
- Write welcome email sequence for customers
- Clean up current mailing list – remove current customers from interest list
- Ask yourself – where are you showing up the best? Video? Audio? Periscope? Snapchat? Musically?
- Start posting regularly on your blog
- Start emailing to your list regularly
- Start doing all those things you do – blog, video, podcast, regularly
- Be helpful
- Thank personally people who interact with your social media.
- Respond to all emails
- Research web developer portfolios
- Write job posting for VA & Post
- Interview potential interns
- Styled photography shoot for launch graphics
- Write out & send email to potential affiliate partners
- Create “coming soon” banner & email to send to list
- Shoot sales video for sales page
- Outline/Write sales page
Feel free to steal the list, organize it into categories, and remove any that don’t suit you.
Your “Map & Maintain” Launch To Do List
Make sure to: write it into your planner, put it on a post it, schedule it in your google calendar or other digital time manager.
- Make the list
As I mentioned above, you make the list as you think of things that you know need to happen during the launch. Create a google doc, clear a few blank pages in your bullet journal, create a project in asana and just start the list. At first, you’ll feel like it’s a pile of stuff…and it may not be organized yet. Don’t worry.
This is not your ordinary braindump. You want to keep it focused to all the pieces you can think of related to the launch–everything from the product creation to the graphics your affiliates might need.
- Rearrange it into categories
Once you have the big ‘ole list and you’re pretty sure you’ve got most everything that needs to be planned out and DONE, now it’s time to rearrange everything into categories. Once you see the categories laid out, you’ll likely have a few tasks, emails, or things to add! Do it now!
- Break every item down into tasks or multiple tasks
Go through each category and break things down into tasks. This is important. Webinar is not a task. It’s a part of the project. There are emails. There are landing pages. There’s tech to set up. There’s follow up. There might be blog posts related to your webinar. Break everything down to the task level. Go through each category and make sure you do that before getting to work!
- Set Weekly Deliverables
Look at a calendar and how much actual real time do you have? Now, start putting Categories and tasks into each week. We talk about what to do first in my workshops and programs but the truth is — you can just pick the most complex or difficult categories to start first and get done first. Give yourself plenty of time to do things like – design a website, write emails, create and set up ads campaign.
- Migrate unfinished to the next week
Schedule time every week to go over the past week’s deliverables – note the status, push the work to the following week or decide to put it on your CBB (could be better) list.
- Complete your #DailyEdit
Every morning and/or evening, review your entire list of deliverables for the current week as well as what’s coming up next week. Cut anything you know won’t be possible, is no longer necessary or will simply slow your project down.
Rinse. Repeat.
Once you get into a rhythm, especially with the daily and weekly check-ins, you’ll see the how easy it is stay on track.
The Tools To Help You Manage Your Launch Planning Process
Evernote:
We’ve talked about this tool often on the blog. Interested in reading more about managing your launch using Evernote? Check this post out right here.
Trello
Trello is another great project management tool that I’ve used off and on with specific clients and independent contractors. Check out this video where I share a few reasons why it could be the perfect tool for you:
[youtube]https://youtu.be/1n6TV6Dl_Ic[/youtube]
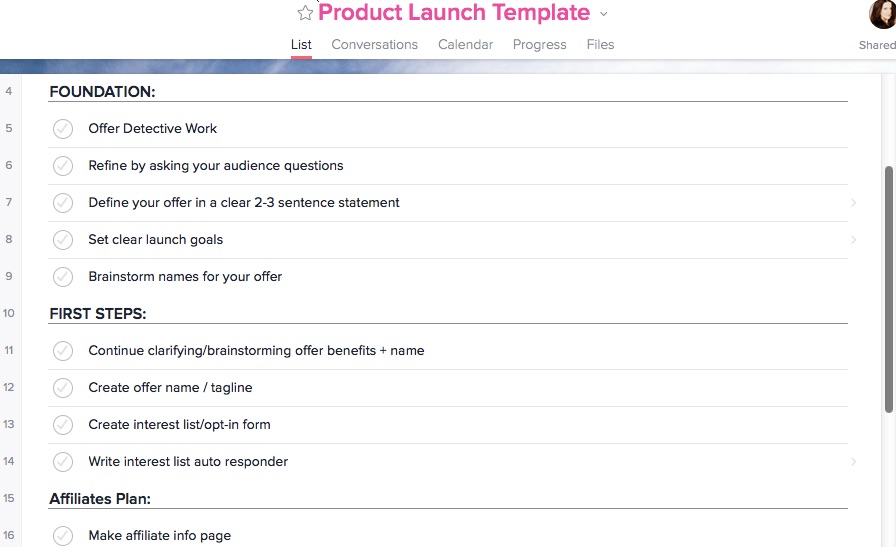
Asana
Asana is the tool I use for everything from launch projects to being the home to my business hub. I store templates that I can re-use for all my launches and resources for team members too! In this shot – you can see that see the categories and different tasks are separated out…you can easily drag and drop tasks as well as add them under the specific headings.
Bullet Journal
Over the past year, I’ve been using bullet journaling off and on. Now, I’m totally on and you’ll see me talking about it a lot pretty much everywhere. What I love is that the system is simple. Read about it over here. You can make each category a “collection” on separate pages in your #bujo.
So what’s next?
Well, you have a few choices.
You can throw yourself into the trenches of getting things done by making a crazy list like the one above. You’ll eventually get there…but will likely feel overwhelmed, lacking direction, and possibly anxious because doing tasks haphazardly doesn’t show you progress.
In fact, you might give up because using step one only (with the master list) gives you no order, no structure for what you’re doing.
You may even struggle with the “what should I do first?” question.
But – I always find that working in a bubble means you will miss something. We’re human. We forget things.
If you need a mix of how-to, accountability, and out of the bubble guidance, I highly recommend you check out my signature program Fearless Launching.
We break apart the master list and follow a launch roadmap (with all these things listed in order for you) here inside Fearless Launching.
Now It’s Your Turn
Leave a comment below and tell us how you plan and let us know when you’ve done your first pass at the master list. We’d love to hear from you!